(2) 드라마/영화 등 자동으로 다운로드하는 NAS서버 만들기
1. SDD 포맷을 exFAT로 만든다.
Samba를 이용하면 특별히 필요는 없을 것 같기는 한데.... 맥, 리눅스, 윈도우 간의 파일시스템 호환성을 위해 exFAT로 포맷을 하였다.(삼바로 연결할 것이라 크게 이슈가 될 부분은 아니겠지만...)

2. 포맷한 SDD를 공유기의 USB(NAS포트)에 연결한다.
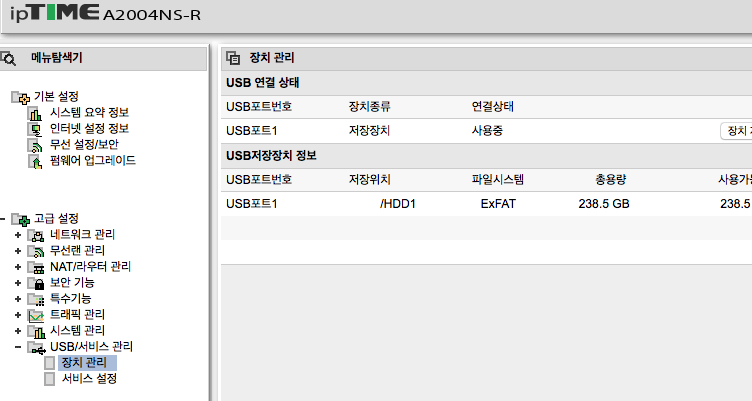
가. 공유기에 SDD가 정상적으로 연결되면 다음과 같이 나올듯... (공유기의 관리자 계정으로 접속)

나. 설정 방법은 왼쪽 맨 아래의 USB/서비스관리메뉴의 서비스 설정을 선택하여, '윈도우파일공유 서비스'를 선택하고, 서비스가 실행될 수 있도록 정보를 설정한다. 아래와 같이 NAS로 운영할 디스크의 이름을 'nas'로 설정하였고, 워크그룹은 윈도우의 default그룹으로 정의하였다. 아래의 정보를 등록 후에 '적용'버튼을 눌러서 설정을 완료한다.

3. 공유된 DISK접속 시험
가. 윈도우의 탐색기에서 '\\nas' 를 입력하거나, 탐색기의 네트워크를 선택하였을 때, 'nas'의 이름의 서버가 보이고, HDD1이라는 디스크로 접속이 된다면 설정이 완료된 것임. 지금 윈도우PC가 없어서, 맥에서만 확인한 캡쳐 화면을 첨부한다.

나. 그런데, HDD3이 어떤 놈인지 모르겠다.... HDD1은 알겠는데.. T.T
다. 라즈베리파이의 rasbian에서 nas저장장치로 연결하는 것을 알아보자.
1) 삼바(SAMBA)에 대해서...
삼바는 SMB/CIFS프로토콜을 사용하여 리눅스와 윈도우간에 파일 및 프린터를 공유 할 수 있게 해주는 패키지이다. SAMBA를 이용하여 리눅스 서버를 타운영체제와의 파일을 공유할 수 있는 파일서버로도 사용할 수 있고, 지금 설명하게 되는 외부의 NAS의 저장장치와 연결을 하여 라즈베리파이에서 외부의 파일서버에 저장 및 조회를 할 수 있도록 하는 기능을 제공한다.
2) 삼바 패키지 설치
아래 명령어로 samba패키지를 다운로드하여 설치를 한다. 아래의 빨간색 부분과 같이 입력을 하여 samba 패키지를 설치해준다.
- 명령어: sudo apt-get install samba samba-common-bin
패키지 목록을 읽는 중입니다... 완료
의존성 트리를 만드는 중입니다
상태 정보를 읽는 중입니다... 완료
The following additional packages will be installed:
attr libaio1 libfile-copy-recursive-perl libsmbclient libwbclient0 python-dnspython
python-ldb python-samba python-tdb samba-common samba-dsdb-modules samba-libs
samba-vfs-modules smbclient tdb-tools update-inetd
제안하는 패키지:
python-gpgme bind9 bind9utils ctdb ldb-tools ntp | chrony smbldap-tools winbind ufw
heimdal-clients
다음 새 패키지를 설치할 것입니다:
attr libaio1 libfile-copy-recursive-perl python-dnspython python-ldb python-samba python-tdb
samba samba-common-bin samba-dsdb-modules samba-vfs-modules tdb-tools update-inetd
다음 패키지를 업그레이드할 것입니다:
libsmbclient libwbclient0 samba-common samba-libs smbclient
5개 업그레이드, 13개 새로 설치, 0개 제거 및 108개 업그레이드 안 함.
8,417 k바이트/8,682 k바이트 아카이브를 받아야 합니다.
이 작업 후 23.7 M바이트의 디스크 공간을 더 사용하게 됩니다.
계속 하시겠습니까? [Y/n] Y
3) 설치가 다 된 후에, nas 디스크로 접속하기 위한 id/pwd설정 파일을 생성하자
접속정보 파일은 /root/.smbcredentials 에 위치하게 하여, 비번이 일반 사용자에게 오픈되지 않도록 하고...
아래의 예처럼, username과 password에는 NAS설정할 때의 id/pwd를 지정한다.

4) /etc/fstab파일의 맨 아랫 줄에, NAS의 저장장치와 연결하기 위한 정보를 추가한다. 일반적으로는 /mnt 아래의 폴더를 네트워크 파일시스템도 연결하는 경우가 일반적일터인데..., /mnt폴더가 아닌, /media/nas 폴더를 생성하고, 그 폴더와 NAS의 HDD1폴더를 연결하도록 하였다.

5) NAS의 HDD1을 라즈베리파이에서 접속 가능하도록 mount를 해보자
명령어: sudo mount -a 를 입력하면 된다.

위의 예와 같이, NAS에 저장된 파일 및 폴더가 /media/nas 에 연결되어서 공유된 것을 볼수 있다. 당연히, 이 폴더에 저장하면 NAS의 HDD1디스크에 저장된다.
6) 만일, cifs 머시기 오류가 난다면... 아래와 같이..
sudo mount -a
mount: /media/nas: bad option; for several filesystems (e.g. nfs, cifs) you might need a /sbin/mount.<type> helper program.
7) chatGPT에 물어보니, 이렇게 나온다.
The error message suggests that you might be trying to mount a filesystem that requires a specific helper program, but the program is missing on your system.

You can try the following steps to resolve the issue:

    Check if you have installed the necessary packages to support the filesystem you are trying to mount. For example, if you are trying to mount a CIFS filesystem, you should have the cifs-utils package installed.

    Make sure that the helper program is installed on your system. For example, the CIFS filesystem requires the mount.cifs program to be present in the /sbin directory.

    If the helper program is missing, you can install it using your system's package manager. For example, on a Debian-based system, you can run the following command to install the cifs-utils package:

    arduino

    sudo apt-get install cifs-utils

    If the helper program is already installed, make sure that it is in the correct location. You can check the location of the helper program in the mount options specified in your /etc/fstab file.

    If none of the above steps work, you may need to check if the filesystem is correctly configured on the remote server, and if the necessary ports are open.

Once you have made the necessary changes, you can try running sudo mount -a again to see if the issue is resolved.
8) sudo apt-get install cifs-utils 로 cifs-utils를 설치하면, 오류가 없어진다.
9) 그런데, /etc/fstab 파일에 정보를 추가해두었는데, 라즈베리파이를 리부팅하면, 자동으로 폴더가 mount되어야 하는데, 자동 마운트가 되지 않는다. 명령어로 mount -a 을 입력해야지만 정상적으로 연결이 된다.
이 사유는 찾지를 못하겠다. 이 부분은 나중에 찾아보자...