간략히 요약한다. 아래 화면은 맥화면이지만, 윈도우에서도 동일하게 작동된다.
1. node js 홈페이지에 접속해서, nodejs를 설치한다. gemini-cli 사용을 위해서는 nodejs 18 버전 이상을 사용해야 한다.
* node js 홈페이지: https://nodejs.org/ko
Node.js — Run JavaScript Everywhere
Node.js® is a free, open-source, cross-platform JavaScript runtime environment that lets developers create servers, web apps, command line tools and scripts.
nodejs.org
2. 노드JS 홈페이지에서 다운로드 메뉴를 선택한 후에, 본인의 PC에 맞는 버전을 설치한다. 난, 맨 아래에 표시된 설치 프로그램을 선택해서 다운로드 받았다. 맨아래의 macOS설치 프로그램을 선택하여 설치하였다.
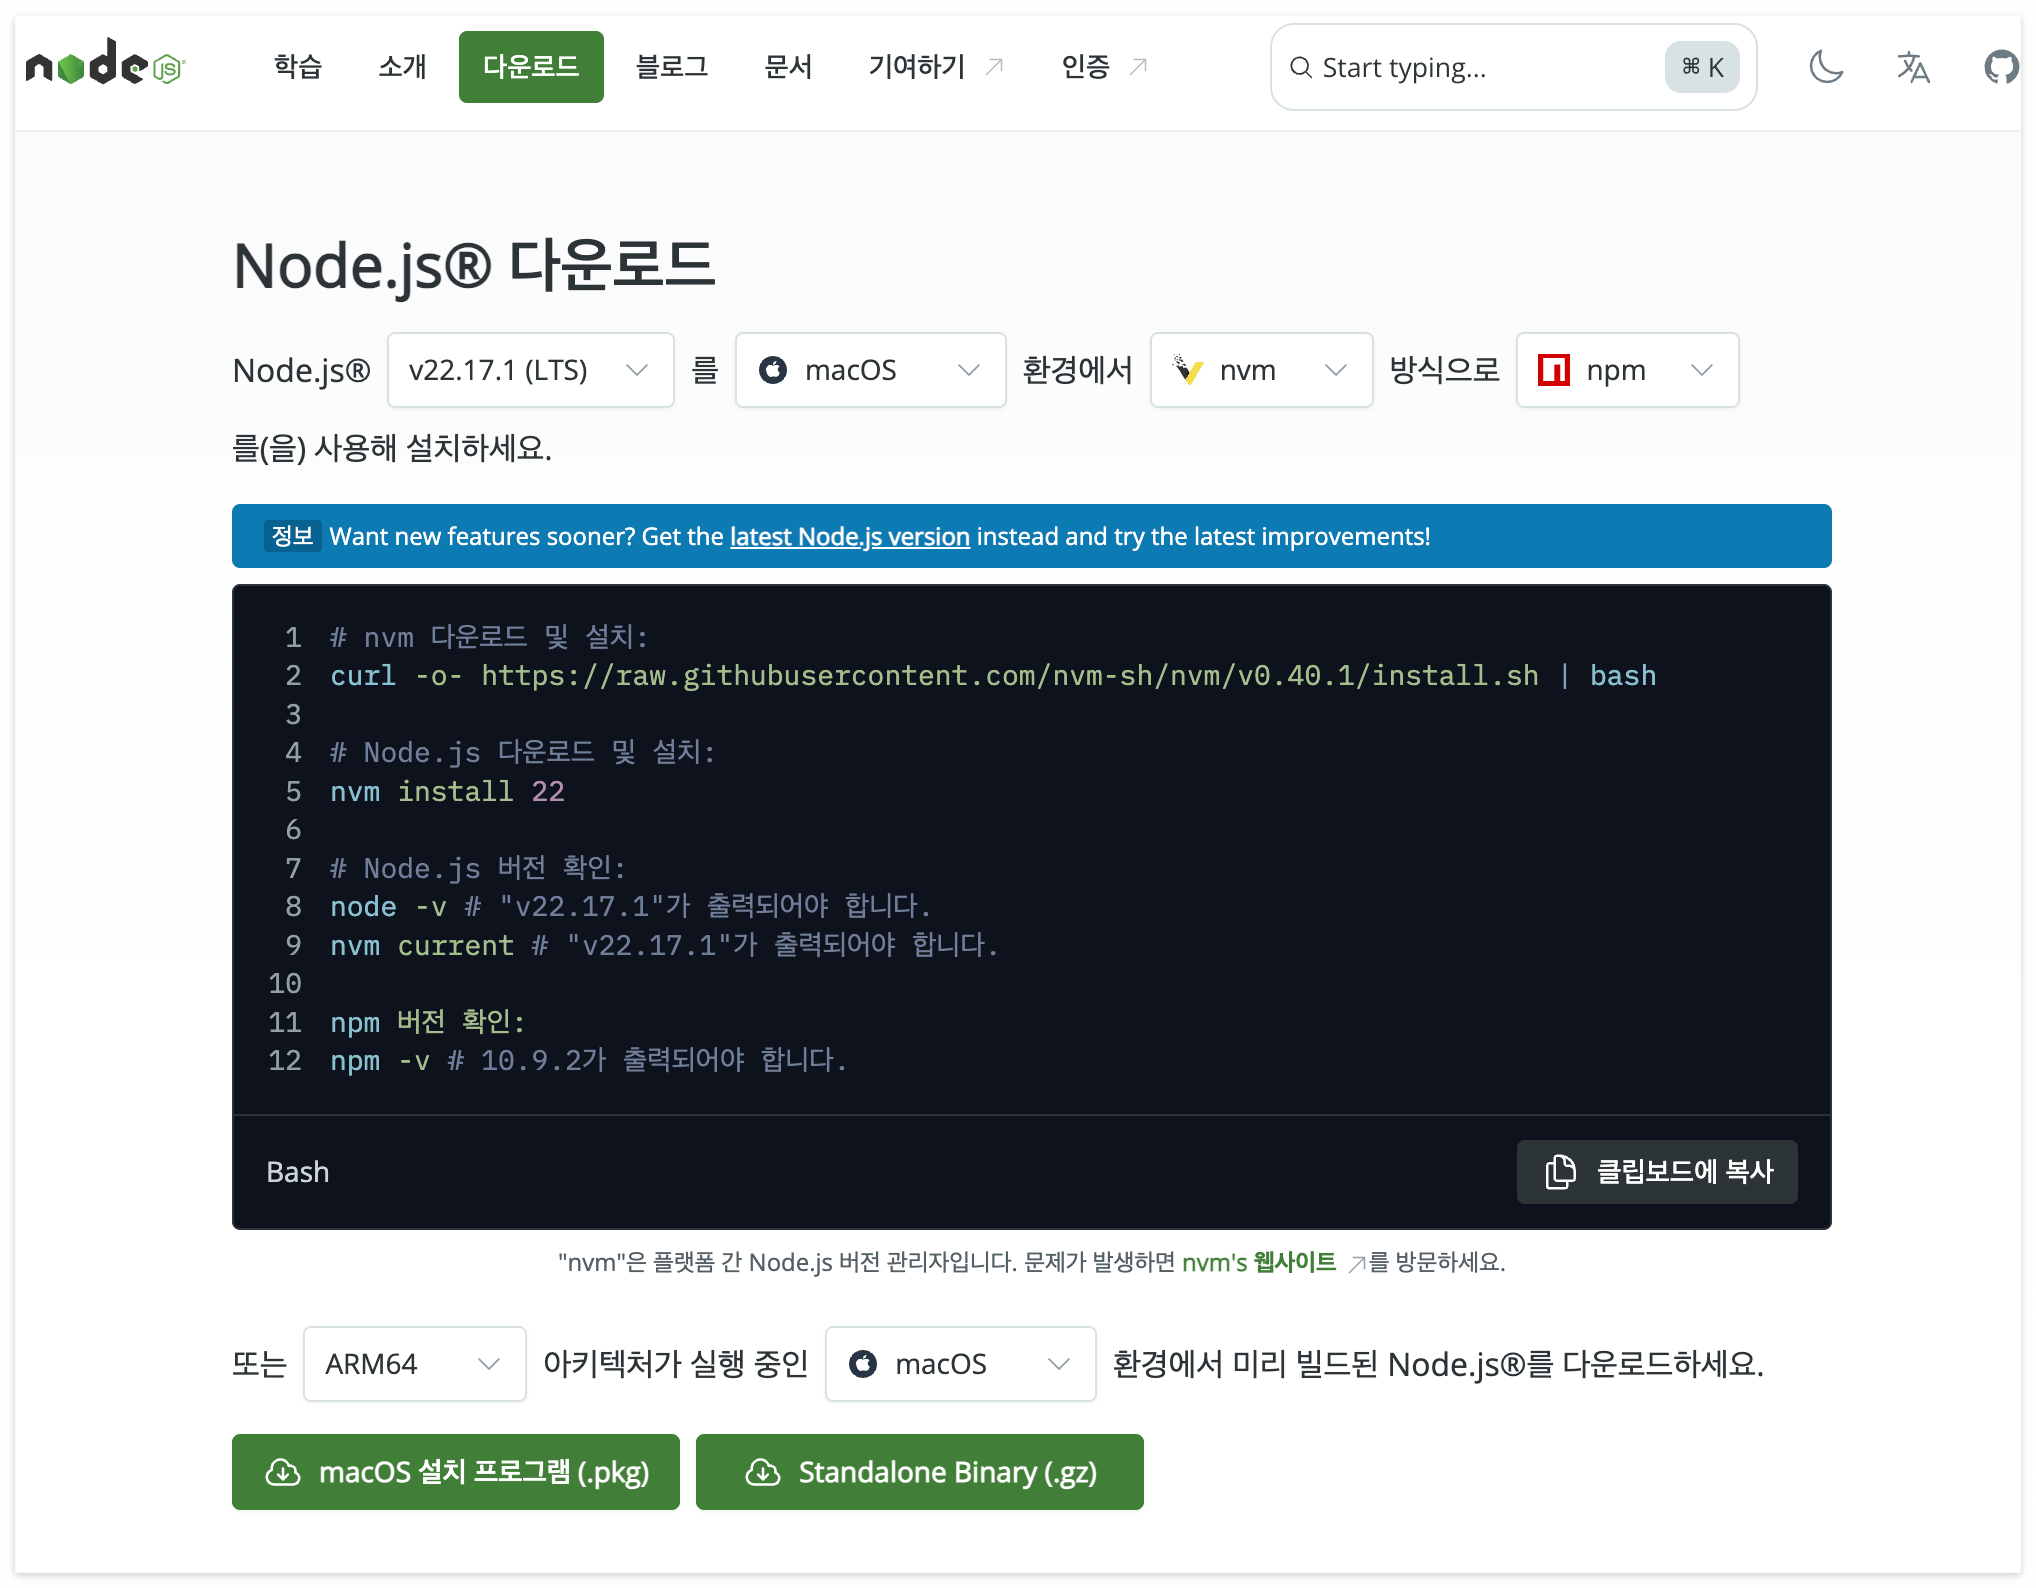
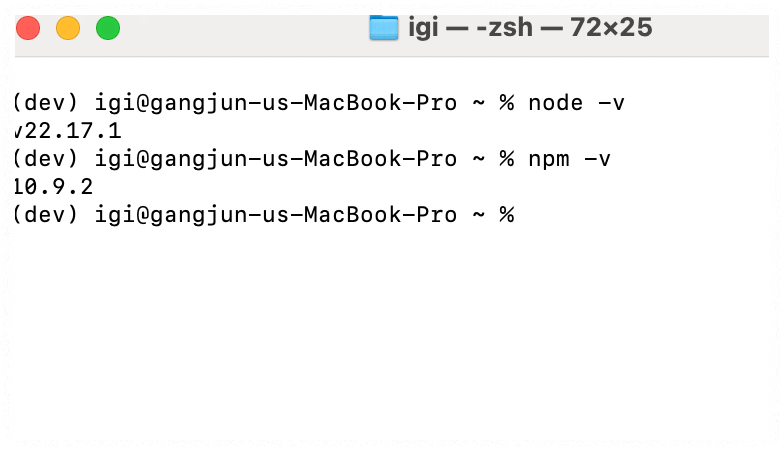
3. 설치 프로그램에서는 node와 npm이 설치가 된다. 설치가 완료되었으면 터미널(command)창에서 설치 여부를 아래와 같이 확인해본다.
4. gemini-cli 를 설치하기 위해, 아래 명령을 실행한다.
$ npx https://github.com/google-gemini/gemini-cli

Need to install the following packages:
github:google-gemini/gemini-cli
Ok to proceed? (y)

npm error code EACCES
npm error syscall mkdir
npm error path /Users/igi/.npm/_cacache/index-v5/68/48
npm error errno -13
npm error
npm error Your cache folder contains root-owned files, due to a bug in
npm error previous versions of npm which has since been addressed.
npm error
npm error To permanently fix this problem, please run:
npm error   sudo chown -R 502:20 "/Users/igi/.npm"
npm error A complete log of this run can be found in: /Users/igi/.npm/_logs/2025-07-26T03_47_59_089Z-debug-0.log
* 무슨 권한 오류가 발생되었다.
* 위의 설명에 있는 것 처럼, 그대로 따라 해본다.
$ sudo chown -R 502:20 ~igi/.npm
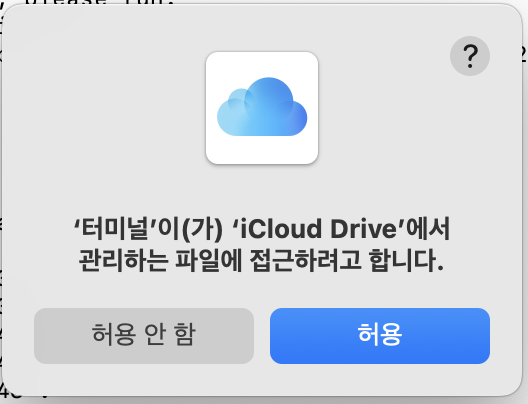
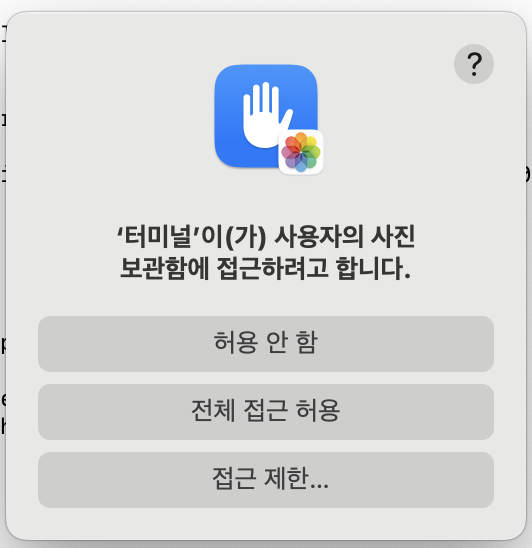
5. 다시, "4"에서 사용한 것 처럼, 다시 명령을 입력해보자. 그러면, OSX에서는 팝업이 몇개 뜨면서 권한 승인을 하라고 한다. 아래와 같은 동의 받는 화면이 4개가 뜬 것 같다.
6. 이렇게 나온다.
$ npx https://github.com/google-gemini/gemini-cli

Need to install the following packags:
github:google-gemini/gemini-cli
Ok to proceed? (y)


 ███            █████████  ██████████ ██████   ██████ █████ ██████   █████ █████
░░░███         ███░░░░░███░░███░░░░░█░░██████ ██████ ░░███ ░░██████ ░░███ ░░███
  ░░░███      ███     ░░░  ░███  █ ░  ░███░█████░███  ░███  ░███░███ ░███  ░███
    ░░░███   ░███          ░██████    ░███░░███ ░███  ░███  ░███░░███░███  ░███
     ███░    ░███    █████ ░███░░█    ░███ ░░░  ░███  ░███  ░███ ░░██████  ░███
   ███░      ░░███  ░░███  ░███ ░   █ ░███      ░███  ░███  ░███  ░░█████  ░███
 ███░         ░░█████████  ██████████ █████     █████ █████ █████  ░░█████ █████
░░░            ░░░░░░░░░  ░░░░░░░░░░ ░░░░░     ░░░░░ ░░░░░ ░░░░░    ░░░░░ ░░░░░

Tips for getting started:
1. Ask questions, edit files, or run commands.
2. Be specific for the best results.
3. Create GEMINI.md files to customize your interactions with Gemini.
4. /help for more information.

╭────────────────────────────────────────────────────────────────────────────────────╮
│ You are running Gemini CLI in your home directory. It is recommended to run in a   │
│ project-specific directory.                                                        │
╰────────────────────────────────────────────────────────────────────────────────────╯

╭────────────────────────────────────────────────────────────────────────────────────╮
│                                                                                    │
│ Get started                                                                        │
│                                                                                    │
│ How would you like to authenticate for this project?                               │
│                                                                                    │
│ ● 1. Login with Google                                                             │
│   2. Use Gemini API Key                                                            │
│   3. Vertex AI                                                                     │
│                                                                                    │
│ (Use Enter to select)                                                              │
│                                                                                    │
│ Terms of Services and Privacy Notice for Gemini CLI                                │
│                                                                                    │
│ https://github.com/google-gemini/gemini-cli/blob/main/docs/tos-privacy.md          │
│                                                                                    │
╰────────────────────────────────────────────────────────────────────────────────────╯
~             no sandbox (see /docs)                gemini-2.5-pro (100% context left)
7. 난, 그냥 '1. Login with Google'을 선택하였다. 그러면, 브라우저에서 구글 계정으로 로그인을 하면 된다. (API key 발급 받는 것은 맨 아래에 추가 예정)
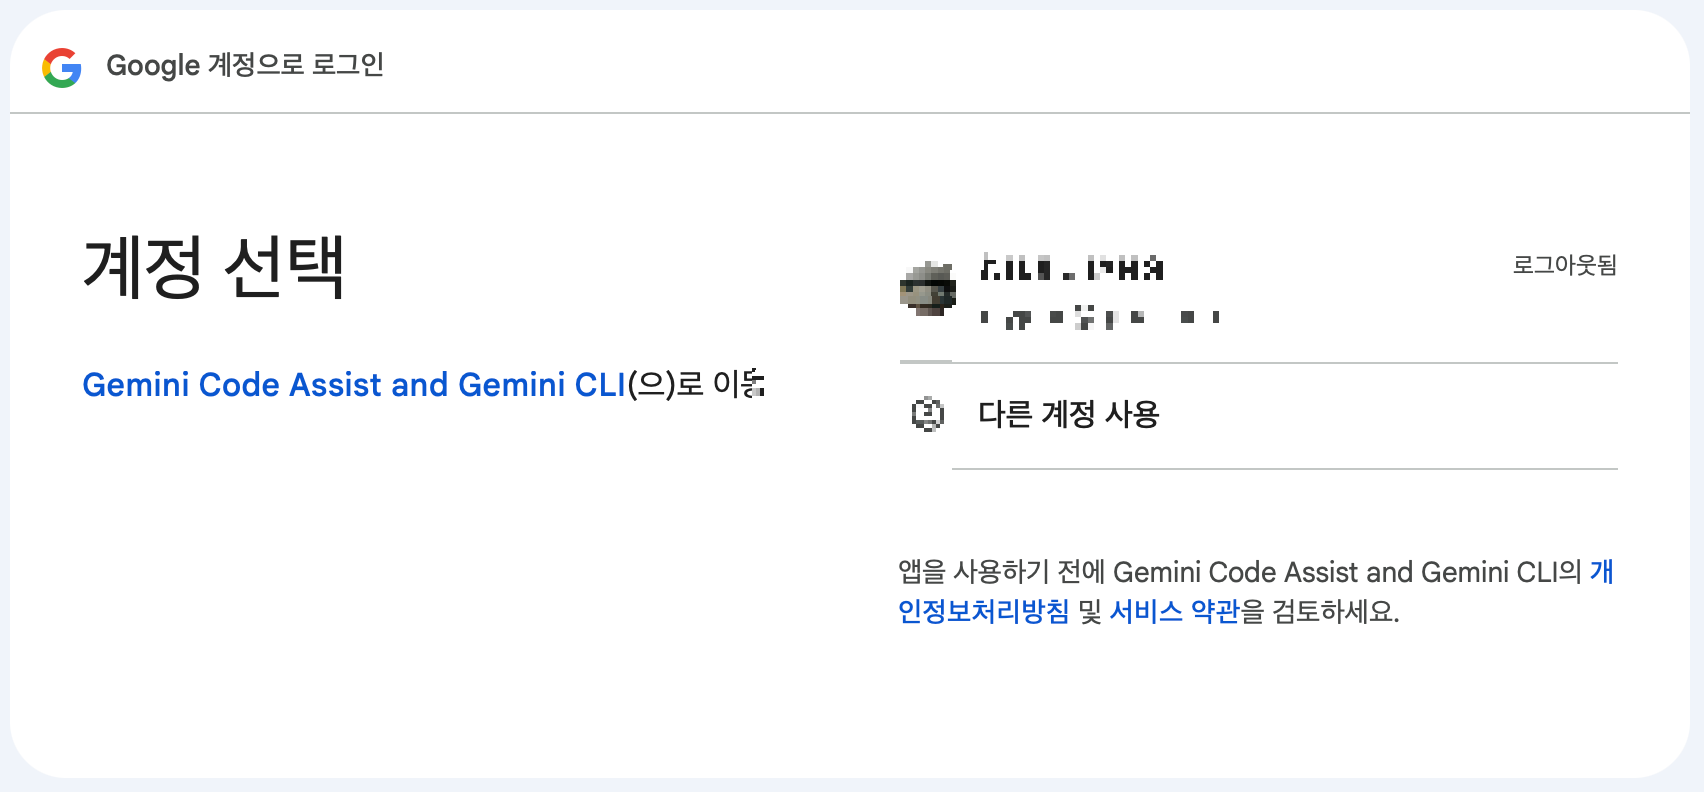
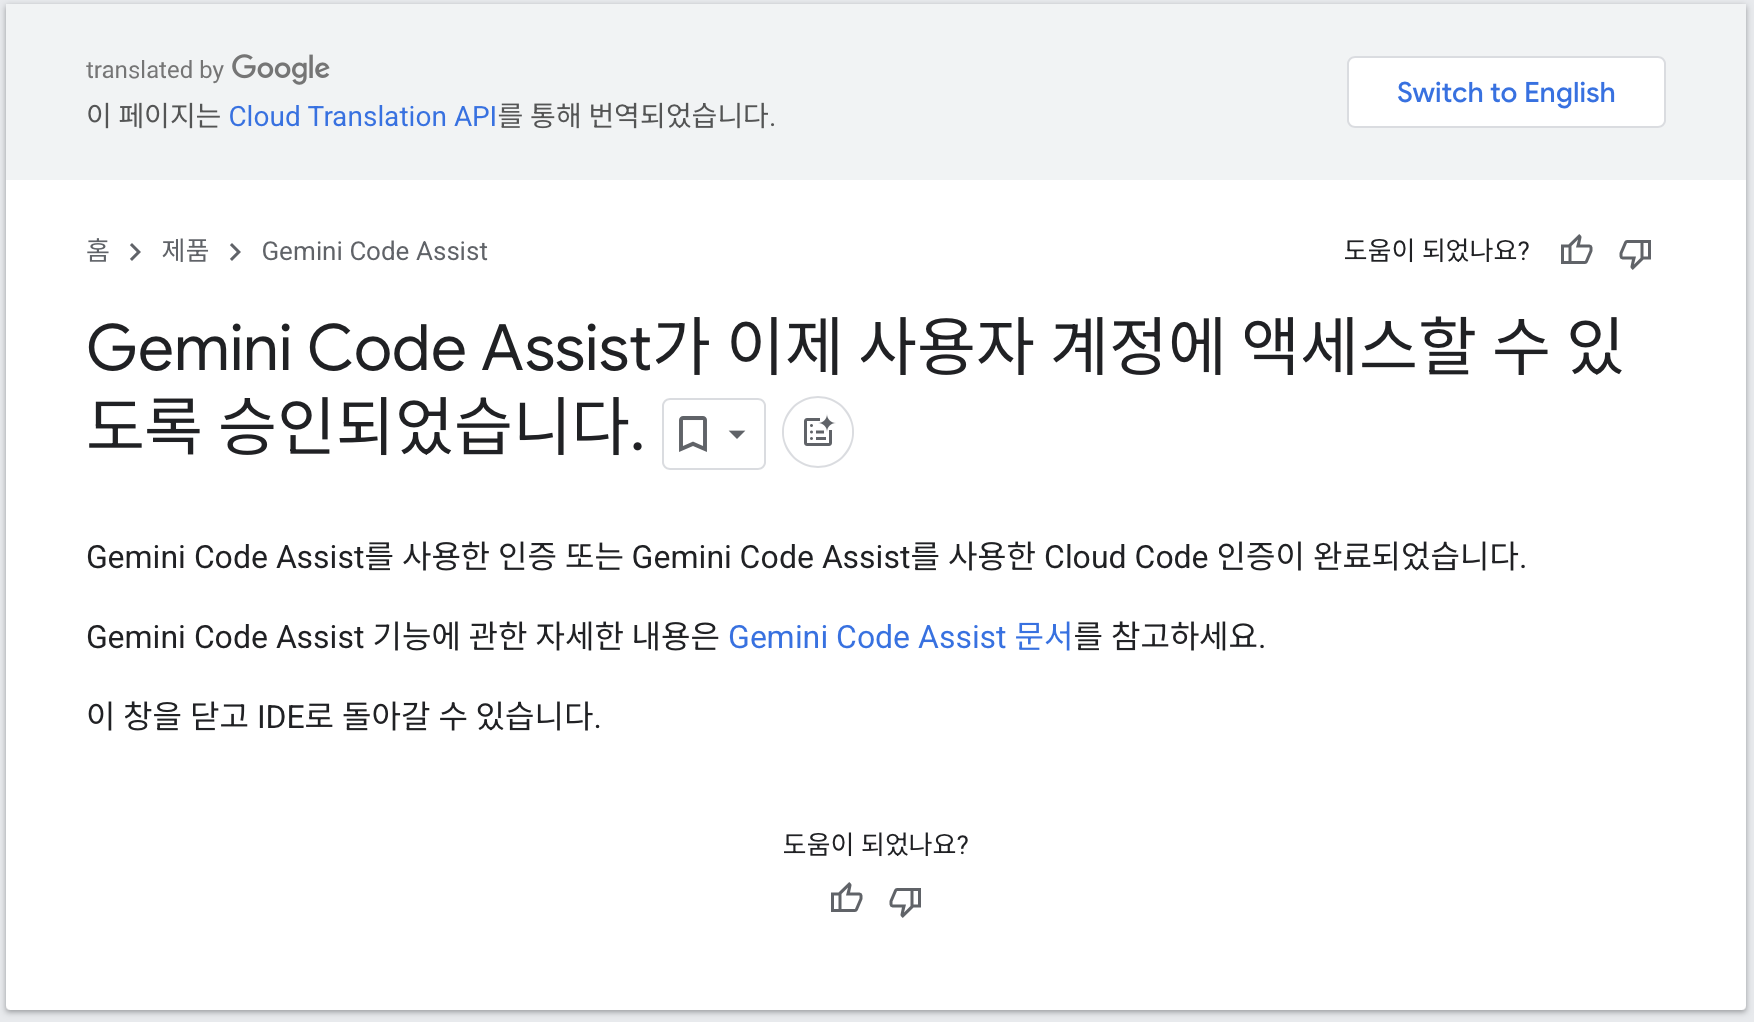
8. 로그인 후에, 계속 동의를 하다가 보면, 아래와 같이 화면이 나온다. 이 창은 닫아도 된다.
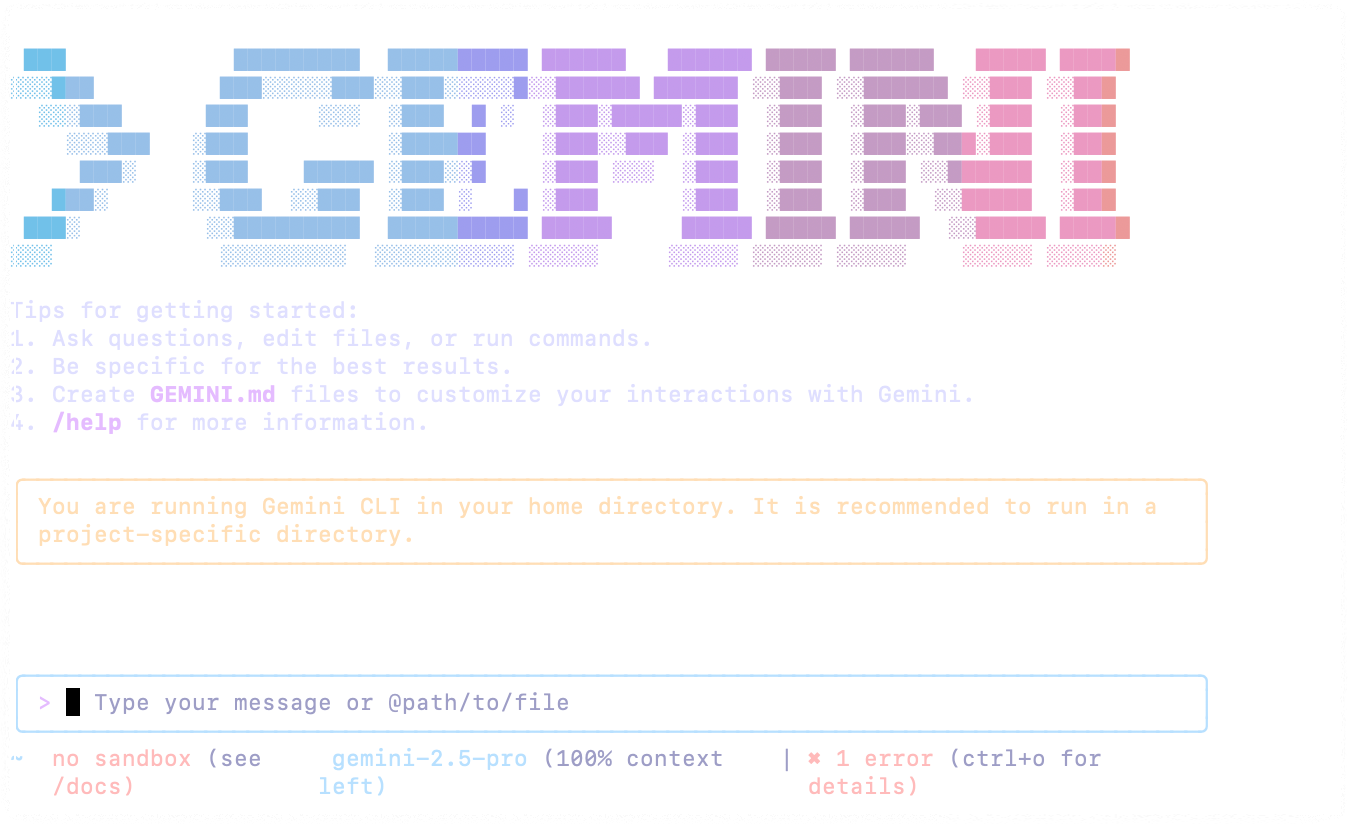
9. 터미널 화면에서는 아래와 같이 Gemini cli 가 사용할 수 있는 준비가 된 상태가 된다.
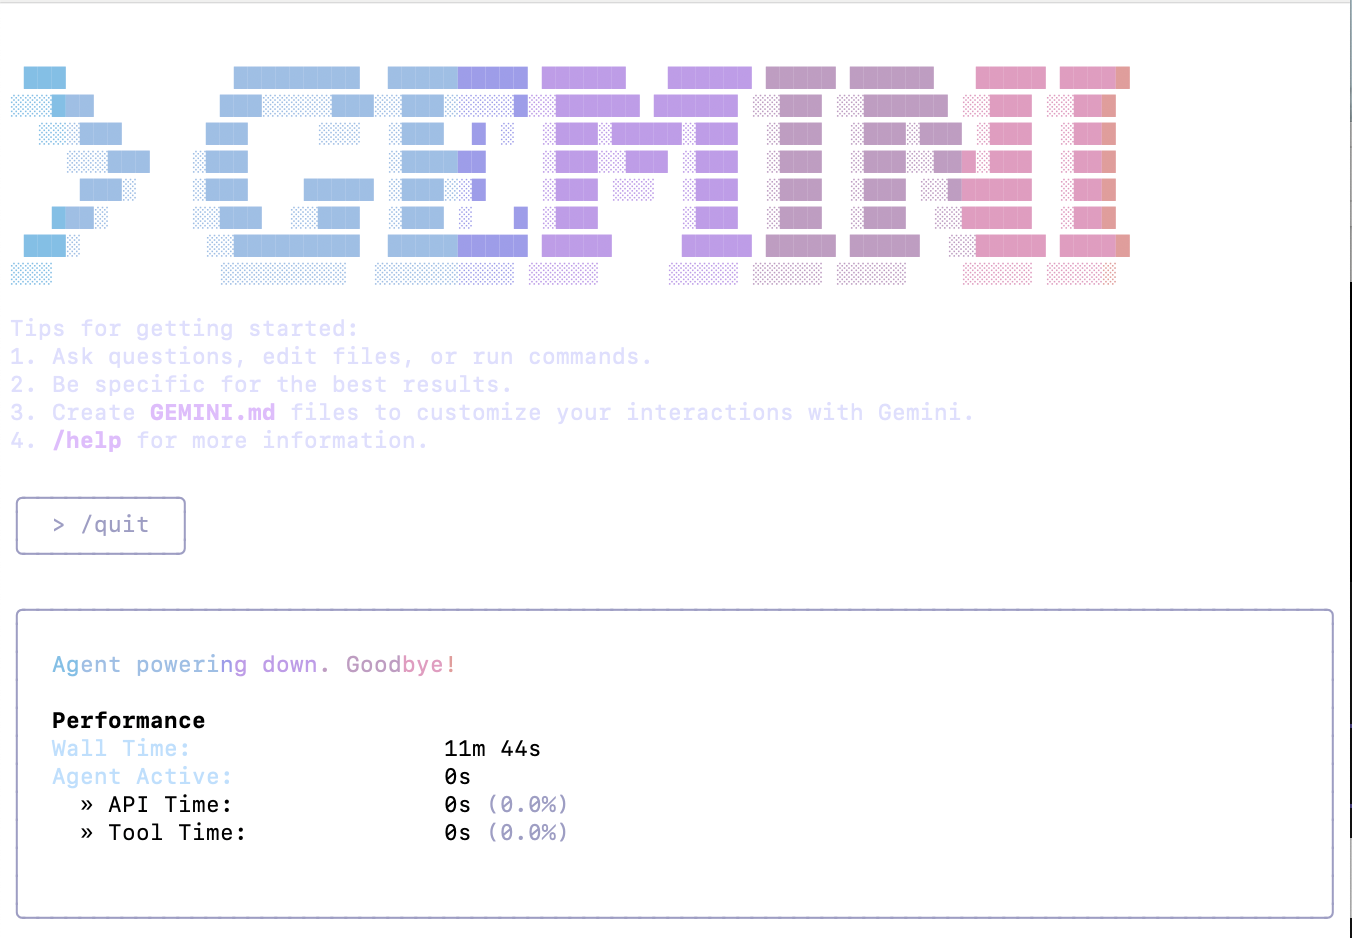
10. 종료를 하려면, '/quit'을 입력한다.
11. 다시 gemini cli를 실행해보자. 위에서 처럼 길게 적지 않아도 된다. 그냥 gemini를 입력하면 된다.
$ gemini
12. "7번"에서 구글 API계정을 발급 받지 않았을 경우에는 아래 주소에 접속을 하여 API Key를 발급 받아야 한다.
- 구글API Key 발급하는 구글의 AI스튜디오 홈페이지에 접속한다. : https://aistudio.google.com/apikey
로그인 - Google 계정
이메일 또는 휴대전화
accounts.google.com
- 구글 계정으로 로그인을 한다.
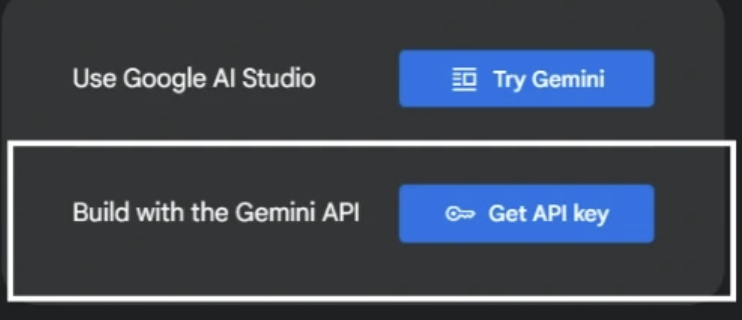
- 화면에 팝업되는 창에서 두번째 항목인 "Build with the Gemini API" 항목을 선택한다.
- API를 만들 프로젝트 이름은 아무것이나 입력하면 된다.
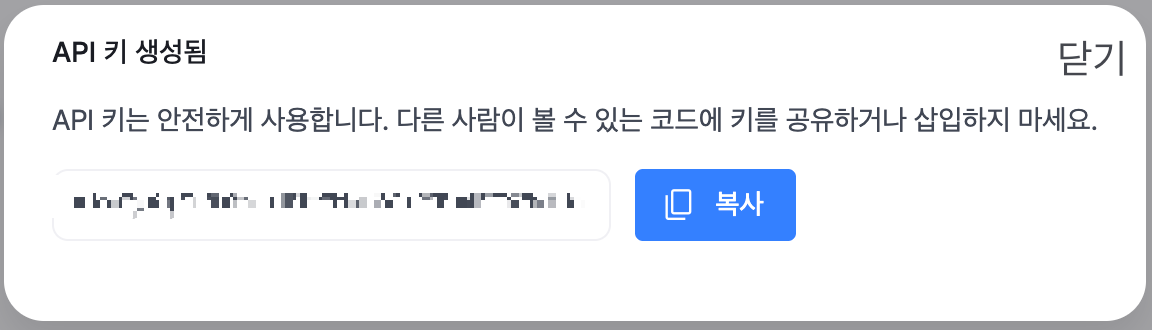
- 생성된 API Key 정보는 아래와 같이 만들어진다. 여기서 API Key는 다른 곳에 오픈 안되게 잘 관리해야 한다.

- 위의. API Key를 선택하면, 아래와 같이 API key를 조회할 수 있고, 복사를 할수 있다. 복사 버튼을 눌러서 복사를 한다.
- 이 API key를 쉘의 환경변수로 등록을 한다. OSX의 경우, 기본적으로 zsh를 사용하기 때문에 내 PC의 경우 찾아보니 홈디렉토리의 ".zprofile"에 추가를 해주면 되었다.
$ vi .zprofile

export GEMINI_API_KEY = "복사한 gemini google api key 값"- 그 다음은 터미널을 다시 실행하거나, 아래의 명령으로 이 값을 설정하면 된다.
$ source . .zprofile

$ env | grep GEMINI

GEMINI_API_KEY=abcdef123455666(key)'Jetson & 머신러닝' 카테고리의 다른 글
| 사진 파일 중복 제거 및 유사 파일 제거를 위한 프롬프트 정리 (0) | 2025.07.26 |
|---|---|
| gemini 에서 github MCP연결하기 (4) | 2025.07.26 |
| ubuntu gui 원격접속 (x2go 설치) (0) | 2025.02.17 |
| [3] YOLO기반의 신호등 신호 인식을 통한 신호변경 안내 및 앞 차 출발인식 시스템 구축(프로그래밍, 하드웨어 구성 포함) (2) | 2024.07.12 |
| ComfyUI , manager 설치 / 실행(디퓨전.....) (0) | 2024.07.09 |